Hello fellow yarn enthusiasts! Get ready to add a touch of spooky-cute charm to your life with our fantastic collection of crochet bat amigurumi patterns. Imagine a plump, cuddly bat, complete with floppy ears, tiny wings ready for flight, and those irresistible button eyes – perfect for perching on a shelf or snuggling with!
Whether you’re a budding crochet artist just learning your stitches or a seasoned pro looking for a quick and delightful project, these patterns are designed with you in mind. They make the most adorable gifts for Halloween lovers, quirky additions to your home decor, or simply a fun way to bring a little handmade magic into your day. So grab your hook and some cozy yarn, and let’s dive into the wonderful world of amigurumi bats!
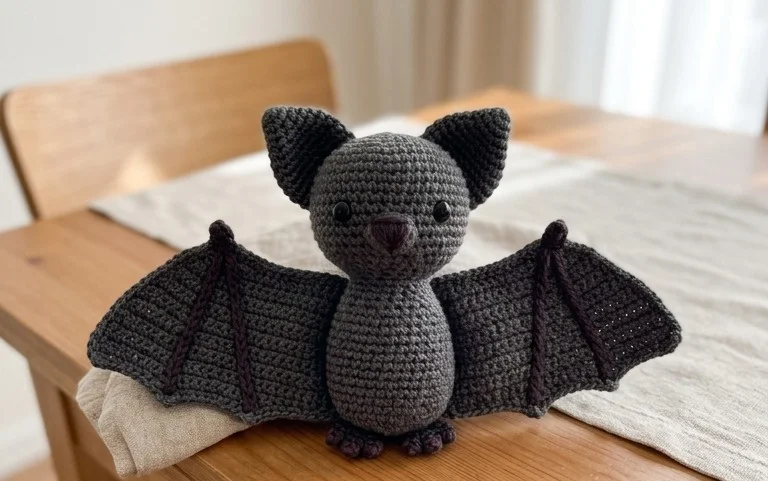
## Unleash Your Inner Spooktacular Crafter: The Delightful Crochet Bat Amigurumi
As the nights draw in and a certain chill fills the air, it’s the perfect time to embrace the whimsy of Halloween (or any spooky season, really!). And what could be more enchanting than a cuddly crochet bat amigurumi? These adorable creatures, with their big eyes and floppy ears, are surprisingly simple to create, making them a fantastic project for both seasoned crocheters and enthusiastic beginners. Whether you’re looking for a free pattern to dip your toes into amigurumi or a premium, detailed design for a truly unique creation, the world of crochet bats offers a delightful journey. This article will guide you through everything you need to know to bring these charming nocturnal friends to life.
### Yarn and Hook: Your Bat’s Cozy Companions
The foundation of any successful amigurumi project lies in selecting the right yarn and hook. For our crochet bats, we’re aiming for a smooth, soft texture that will showcase your stitches beautifully and create a huggable finished product.
* **Yarn Recommendations:**
* **Worsted Weight Cotton Yarn:** This is the gold standard for amigurumi. Cotton is durable, easy to work with, and holds its shape well, preventing your bat from becoming saggy. Brands like Lily Sugar ‘n Cream, Lion Brand 24/7 Cotton, or Paintbox Yarns Cotton Aran are excellent choices. They come in a vast array of colors, perfect for creating a whole colony of unique bats.
* **Acrylic Yarn:** While cotton is preferred for structure, a good quality acrylic yarn can also work. Look for anti-pilling or smooth acrylics to avoid fuzziness. This can be a more budget-friendly option and offers even more color choices.
* **Specialty Yarns:** For a truly unique bat, consider fuzzy yarns for a “velvet” effect or even metallic yarns for a touch of Halloween sparkle. However, be aware that these can be trickier to work with for beginners.
* **Hook Size:** The general rule for amigurumi is to use a hook size *smaller* than what is recommended on your yarn label. This creates tighter stitches, preventing stuffing from peeking through.
* For worsted weight yarn, a **2.75mm (C/2) to 3.5mm (E/4)** hook is usually ideal.
* Experiment with your tension! If your stitches are too loose, go down a hook size. If you’re struggling to create the stitches, go up a size.
### Mastering the Magic: Essential Stitch Techniques
Amigurumi relies on a few fundamental crochet stitches that, when combined, create intricate shapes. Don’t be intimidated – these are easily learned and incredibly rewarding!
* **Magic Ring (or Magic Circle):** This is the secret to creating seamless, tight circles for the head and body, eliminating that dreaded hole in the center. It might look fiddly at first, but with a little practice, it becomes second nature.
* **Single Crochet (sc):** This is the workhorse of amigurumi. It creates a dense fabric perfect for stuffing.
* **Increase (inc):** Usually achieved by working two single crochets into the same stitch. This is how you gradually enlarge your crocheted pieces.
* **Decrease (dec):** Most commonly done using the invisible decrease (working a single crochet through the front loops of two stitches). This technique creates a neat, unnoticeable reduction in stitches, essential for shaping.
* **Slip Stitch (sl st):** Used for joining rounds or creating decorative elements.
* **Stitch Markers:** Absolutely indispensable! Use these to mark the beginning of rounds, preventing you from losing your place and ensuring your pieces grow evenly.
### Tips for the Budding Bat-Maker: A Beginner’s Best Friend
If you’re new to amigurumi, these tips will help smooth out any bumps in your crafting journey.
* **Read Through the Pattern First:** Before you even pick up your hook, read the entire pattern from beginning to end. Familiarize yourself with the abbreviations and the overall structure.
* **Start Simple:** Choose a pattern marked as beginner-friendly. These often have fewer intricate pieces or simpler shaping.
* **Practice Your Stitches:** If you’re unsure about the magic ring or invisible decrease, practice them separately on a small swatch. There are tons of fantastic video tutorials available online.
* **Stuff As You Go:** Don’t wait until the very end to stuff your bat! Stuff each piece firmly but not so tightly that you distort the stitches. Gradually add stuffing as you crochet each round, especially for the head and body. This makes it easier to distribute the stuffing evenly.
* **Use the Right Stuffing:** Polyester fiberfill is the most common and affordable stuffing material. Ensure it’s clean and fluff it up before using to avoid lumps.
* **Count Your Stitches!** This is non-negotiable in amigurumi. Regularly count your stitches at the end of each round to ensure you haven’t missed any or accidentally added extra. This is the key to success!
### A Splash of Personality: Customizing Your Crochet Bat
The beauty of amigurumi is the endless potential for personalization! Let your creativity soar and make your bat truly your own.
* **Color Combinations:**
* **Classic Black/Gray:** For a traditional, mysterious bat.
* **Spooky Purple/Orange:** Embrace the Halloween spirit!
* **Earthy Browns/Beiges:** For a more natural, woodland creature feel.
* **Pastel Hues:** Create an adorable, softer version of a bat.
* **Stripes or Color Blocking:** Introduce contrasting colors for wings, ears, or tummy.
* **Sizes:** Most amigurumi patterns can be easily resized.
* **Smaller Bat:** Use a finer weight yarn and a smaller hook.
* **Larger Bat:** Use a bulkier yarn and a larger hook. Remember that changing yarn weight and hook size will affect the overall proportions and how the individual pieces fit together, so you might need to adjust stitch counts slightly for larger versions.
* **Embellishments:**
* **Eyes:** Safety eyes are popular for their durability and professional look. Embroidered eyes with contrasting thread offer a softer, more handmade appeal. You can even add googly eyes for a quirky touch!
* **Mouths and Noses:** Embroider simple smiling mouths, mischievous grins, or tiny noses.
* **Accessories:** Crochet tiny hats, scarves, or even little ghost companions for your bat to hold.
### Keeping Your Bat Bat-tastic: Care Instructions
Your finished crochet bat will be a treasured item, and with a little care, it will last for years to come.
* **Washing:** For most cotton or acrylic amigurumi, a gentle hand wash is recommended. Use cool water and a mild detergent. Gently squeeze out excess water – do not wring.
* **Drying:** Lay your bat flat on a clean towel and reshape it as needed. Allow it to air dry completely away from direct sunlight or heat, which can cause colors to fade or fibers to shrink.
* **Spot Cleaning:** For minor spills or marks, try spot cleaning with a damp cloth and a tiny bit of mild soap.
* **Durability:** Amigurumi can be surprisingly durable, but avoid rough play, especially for pieces with embellishments like safety eyes.
### Beyond the Bat: Inspiring Project Ideas
Once you’ve mastered the crochet bat, the possibilities for your new skills are endless!
* **A Bat Family:** Create a whole flock of bats in various sizes and colors.
* **Halloween Garland:** String several bats together with yarn or ribbon to create a festive garland.
* **Keychains:** Make smaller versions of your bat and attach a keychain ring for a cute accessory.
* **Cushions:** If you’ve made a larger bat, it can be a wonderfully quirky cushion for a child’s room.
* **Gift Giving:** Crochet bats make incredibly thoughtful and unique handmade gifts for friends and family who appreciate the crafty arts.
* **Seasonal Decor:** Beyond Halloween, these little bats can add a touch of whimsical charm to any room throughout the year.
Whether you choose a free pattern to practice your skills or invest in a detailed paid pattern for a truly special creation, crocheting a bat amigurumi is a wonderfully rewarding endeavor. With a little patience, the right materials, and a sprinkle of creativity, you’ll soon have a charming, cuddly companion ready to wing its way into your heart! Happy crocheting!
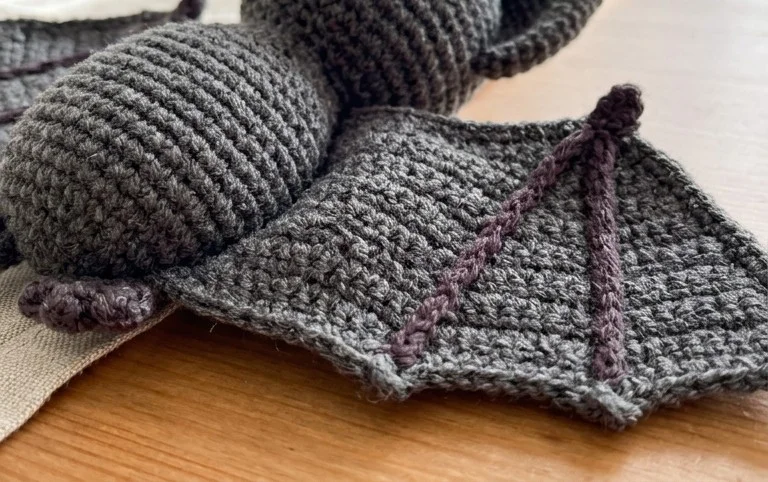
We hope this collection of free and paid crochet bat amigurumi patterns has inspired your next spooky creation! Don’t be shy – grab your hook and yarn and dive into making your own adorable bat friend. We can’t wait to see your finished projects! Share your delightful little bats on social media using #CrochetBat and tag us, so we can admire your handiwork.
Feeling adventurous? Experiment with different yarn colors, add unique embellishments like glow-in-the-dark yarn or googly eyes, or even try creating a whole colony! And when you’re ready for more crafting fun, be sure to explore our other DIY Magazine patterns for endless creative possibilities.